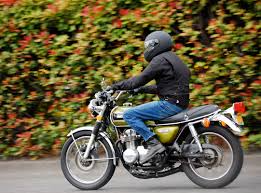
Skills are the physical actions a rider uses to ride. They are learned by practice, not words. To be effective, skills must be automatic. There are two types of skills, basic and advanced. Basic skills are what you learn right away, including getting on the bike, take-off, riding and stopping. You use these skills all the time, so might as well start right. If you start wrong, then you are just practicing mistakes. If you are experienced, then you can skip this section.
Getting on
%3Amax_bytes(150000)%3Astrip_icc()%2FMounting-56a6498e5f9b58b7d0e0d0e0.jpg&imgrefurl=https%3A%2F%2Fwww.thoughtco.com%2Fhow-to-ride-a-motorcycle-2399588&docid=ssFXrwWlaRqI0M&tbnid=VpQD4isR9B6LeM%3A&vet=10ahUKEwj4p9WSka3aAhWDVrwKHa6bDRwQMwg5KAAwAA..i&w=768&h=512&client=firefox-b&bih=835&biw=1707&q=mounting%20a%20motorcycle&ved=0ahUKEwj4p9WSka3aAhWDVrwKHa6bDRwQMwg5KAAwAA&iact=mrc&uact=8)
Getting on a motorbike is the simplest thing in the world, right? Wrong! When you get on a bike, especially a big one, stand close to it and grab both handlebars firmly. Probably it is on a side stand leaning towards you. First straighten the handlebars and pull the front brake on so you have control. Why close? Well if for some reason the the bike falls away from you it can be really hard to stop. Why the brake? Well on a slope when you push it off the stand it can move. Now swing your leg over by sliding the bent knee over the seat. Don’t hurl your leg back, as this puts you off balance. If you have a pack-rack bag, there is no room to do that anyway. Just raise the bent knee and push it over the seat. Now you are on, vertical the bike and kick the stand away. Then plant your left foot, lean the bike onto it, and put your right foot on the break. This frees your hands to adjust your gloves or jacket before you put it into neutral to start. Next is the take off.
Take off
Sitting on the bike, open the choke as necessary. Put the gear in neutral, then turn the ignition to start the bike. Give it a moment to warm up, then plant your right foot and kick back the stand. With all four fingers of the left hand, pull in the clutch, and with your left foot engage first gear. You are now stationary, with front brake still on, but ready to take off.
Slowly open the clutch to the point of engagement (POE). The POE is the point when the clutch lever lets the engine power go to the wheels. It varies from bike to bike, but at the POE the bike will start to pull and the engine revs decrease. The POE can be altered by a knurled adjuster where the cable leaves the clutch lever. When you get to the POE, you have to do two things at the same time:
- Release the front brake so the bike can move.
- Open the clutch to transfer power to the wheels.
- Turn the throttle to keep the engine revs up.
If you do this right, opening the clutch as you turn the throttle gives a nice, smooth, controlled take off. Since you are balancing two things, two things can go wrong:
- Too much power. You take off too fast and lose control or skid.
- Too much clutch. The engine lurches and stalls, and you don’t take off at all.
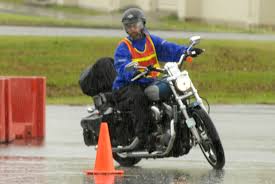
 Don’t worry if you get it wrong first time – it takes practice. When you take off, you need power to accelerate to a safe speed quickly, like when a plane takes off it needs plenty of power to get airborne. At take off, your speed is low because you start at speed zero, but your acceleration is high. Take off involves high acceleration, so if you are on a slippery surface, like a white line, or in gravel, you can easily skid. If you skid while perfectly straight the back wheel spins in place, but any lean and it slides out left or right and you fall off.
The other likely outcome for beginners is to stall. This means too much clutch and not enough throttle. Go easier on the clutch and get the engine at higher “revs”. Dont be afraid of high revs as they dont affect anything until the clutch is out. Get the clutch to the point of engagement slowly but this time keep the revs high. The higher you rev the engine the less chance there is of stalling, and the slower you let the clutch out the less chance of takeoff “lurch”. High revs and slow clutch gives a smooth takeoff.
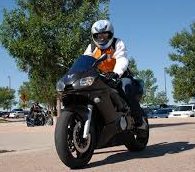
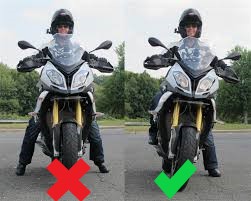
Posture
Posture is how you sit on the bike. You can lean forward, lean back, sit upright or some combination. Racing bikes are designed so riders crouch forward to reduce wind drag, but this becomes uncomfortable over time. Easy rider bikes let you lean back but oddly this is also uncomfortable over time. Touring bikes, designed to ride for long distances, favor an upright posture. Upright is less effort, because the body supports itself, giving a more relaxing ride. Upright gives better vision, because the head is higher. Finally, it gives better control, as the body is not leaning on the hands or feet. Leaning pressure can interfere with hand/foot control actions. Its also better for your back to be upright.
Check your posture when you sit on the motorcycle – can you lift and move your hands and feet without affecting the body? If you relax your arms and fall forward, you were leaning on them. Your hand must be entirely free from body pressure because it interferes with bike control. Another way to check your posture is go on a long trip. If you have a sore back or shoulders at the end of the day, your posture is not right. When you sit upright, you retain a lumbar arch – that arch in the lower back is an important part of good posture. Find a posture that suits you and stick to it.
Foot off the brake
There is some discussion about this. If you ride with your foot right over the brake, then any sudden bump can result in accidental braking with potentially dangerous results. Here’s why. You hit a bump, maybe junk on the road and as the body lurches forward, the foot over the brake accidentally presses the brake on. Unexpectedly stopping or even slowing down like that for no reason is very dangerous, in traffic for example. If you are heavily thrown forward foot on the brake can even throw you off the bike. So I always ride with my right foot to the side of the brake pedal, maybe pointing the foot a little out. With your foot to the side of the brake, if you lurch forward for any reason, the brake is not affected. I only put my foot over the brake when in the ready reaction position, i.e. when braking is needed.
Stopping
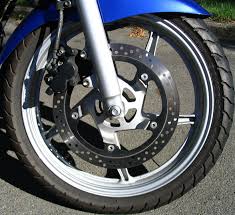
There are two brakes, front and back. When stopping, the weight of you and the bike are thrown forward, pressing the front wheel down. This gives the front wheel more friction and so more stopping power, but if you brake too hard you can go over the top. The most effective brake on a motorbike is the front brake. Experienced riders often mainly control the bike with the front brake because it is so effective, but others suggest learners use the back brake at first for the same reason! I prefer to apply both brakes gently at once, on the principle that how you stop normally is how you will stop in an emergency. So I normally use both brakes at once so my brain will follow the same steps in an emergency. My normal stop and my emergency stop are the same pattern. You cant expect your body to behave differently in a rare emergency from its usual habit. It wont suddenly learn new skills in an emergency, as when the adrenaline is pumping, habit dominates. Practicing using both brakes when normal stopping is building a habit that may save your life. Applying front and back brakes together is a skill that must be practiced until it is automatic. It should be a single gentle action.
When you stop, plant your left foot, lean the bike and press the brake with your right foot. Don’t put down both feet, as it is less stable. When stopped at a red light, don’t put the bike in neutral gear! Keep the bike in first gear with the clutch pulled in. This lets you react faster, which is what riding a bike safely is all about. For example, if someone coming up behind doesnt look like they are going to stop, you can immediately move forward out of their way. If you are in neutral you may well be rear-ended.
Park
Dismount and park is the opposite of mount – with the bike vertical and in first gear, front brake on and two legs down, kick the stand out. Then lean the bike on the stand until you feel it is secure, switch it off and get off. Be careful parking on slopes, because a bike pointing down the slope can roll off the side stand. I usually point it on an angle up the slope to park. Also remember that a bike has no reverse, so if someone parks in front of you pointing downhill you can get stuck, if you are unable to pull the bike back uphill. This especially applies to big bikes.
Controlled braking
Stopping in an emergency is all about controlled braking. If a car suddenly pulls out in front of you, STOP AS FAST AS YOU CAN is NOT a good reaction, as if you jam on the brakes too fast you skid and crash all by yourself. On the other hand, if you brake too slow you hit the car. What to do? As with the clutch, the answer is to know your brake point of engagement (POE). My aim is to quickly get to the brake point of engagement (POE), then slowly squeeze the brakes. You separate braking into stages, one done at maximum speed and the other done with maximum control.
First,get to the braking POE as fast as you can: right hand gets the front brake to the POE and right foot gets to the brake pedal POE. At this point, you can still choose to not brake. Then, apply the brakes with control not panic. The two stages are:
- Engage the brakes fast.
- Squeeze the brakes slowly, with control.
The two stages are different. If you vigorously engage and press the brakes, chances are you will skid and lose control, especially in the wet. If you cautiously engage and press the brakes, you may crash before they activate. Get quickly to the POE, then gently apply the brakes. Emergency stopping is a fast as possible “kick in” followed by a controlled squeezing of the brakes! And if you learn this in normal braking you have a better chance to apply it in emergency braking.
There is no question that in panic situations controlled braking is hard to do! For the front brake, the initial “fingers to the lever” action is fast but the rest is steady and controlled. For the back brake, first “cover” the brake with minimal pressure then apply controlled pressure. To get control, the pressure is from the ankle turning around the pivot of the heel. It’s a controlled ankle turn, not a stomp down with the whole leg. The end result is a smooth and controlled emergency stop.