Advanced riding skills are those you need occasionally or in special circumstances. They develop over time. Dealing with other people on the road, including anticipating, positioning and signaling, are covered later under Situations.
Vertical stability
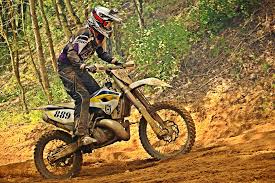
Occasionally you hit a hole in the road that almost bounces you off the bike. It is a scary feeling, as your body leaves the bike and rises in the air. The bike’s shock absorbers are designed to take care of such events, but when they aren’t enough you can use your legs as shock absorbers. You see off-road riders riding with their body raised off the seat for this reason, to absorb hard bumps. They are using their legs to absorb shocks that might otherwise bounce them off the bike.
You dont have to stand up on a bike to do the same thing. If you see a big pothole in the road ahead with no chance to miss it, push down with your legs as you hit it. Even if your body doesnt raise much, this will help absorb the vertical shock. I routinely do this when crossing “speed bumps”. Note: you need footwear with a heel to lock against the foot-pegs, so the foot cannot slip off. Dont try this if you are struggling with normal riding!
Forward stability
If you hit something on the road and are thrown forward, your arms must act as shock absorbers. If you ride with your arms rigidly “locked” they wont be good shock absorbers. A rigid arm is trying to oppose a shock that it should be absorbing it. If you press down on the front shock absorbers of a motorcycle, the bike goes down, it doesn’t rigidly resist. Your arms need to work the same way if you are thrown forward.
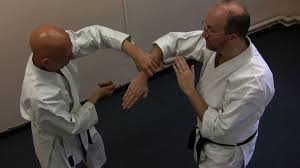
The bendable iron arm is a martial arts way to effectively absorb a shock to the arms. To try this, hold your arms forward, curved at the elbow, and palm down. The arms are bent in a natural inward pointing curve, not rigid, so your elbows don’t “lock” . Now do the same when you hold the motorcycle, with palms down and thumbs lined up against the handle grips. Imagine your arms as “bendable iron”, so your body, arms and the handlebars form a circle, that under forward pressure bends but does not break. Your arms are the shock absorbing part of the circle. Since you never know when you will suddenly hit a pothole or an object on the road, set your arms for forward stability as a safety habit.
Sideways stability
Your arms and legs give forward and vertical stability, but what about sideways stability? Sometimes winds or ridges in the road push the bike sideways. There may be rut that pulls the bike to one side. Or you may hit an object that twists the bike. How can you straighten a sideways movement? The knee tank grip can control sideways forces on a motorcycle. With a firm hold of the handlebar, grip the tank with your knees and push your feet in. This lets you keep the bike from wobbling sideways.
How slow can you go?
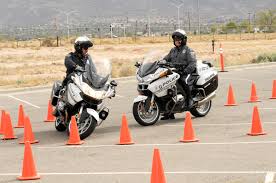
Stability is how well you keep your balance and how little you wobble. With experience, you reduce the natural wavering that occurs as you ride. New riders have a lot of wobble. Skilled riders have very little. Good riding, like good wine, is smooth. Wobble is not bad – it is natural – but the less there is the better the rider.
Stability is especially evident when you start and stop the bike. A stable start means you just lift your feet and go. An unstable start involves swerves and foot dragging. A stable stop means you stop, then calmly put your feet down. An unstable stop involves feet scraping the ground while the bike is moving, with a heavy heave at the end to stop it falling over. Unstable riders tend to wear out their boots.
When you go fast, centrifugal force keeps the bike vertically stable. When you go slow that reduces, so then you find out how stable you are. Your motorcycle skill is not how fast you can go, but how slow you can go. Any fool can twist an accelerator, but to come to a complete stop, stay vertical, then calmly drop a leg, takes skill. The more stable you are, and the less you wobble and the safer you are on a motorcycle, at any speed.
The two-part hand grip
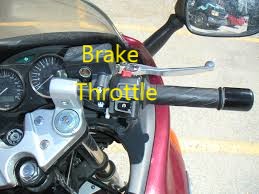
The controls of a motorcycle are sensitive, so a fraction of an inch too much or not enough can cause a crash. Especially important is the right hand, that controls both the accelerator and front brake. I keep these two functions separate, as follows:
- Accelerator Control: “Choke” the accelerator grip as far up the hand as possible, so it sits in the base of the thumb and forefinger “V”. Turning the wrist then turns the accelerator.
- Brake Control: The above lets your fingers pull on the front brake. To check this, with the bike running in neutral and all fingers pulling the brake lever, turn the accelerator. If you can’t do this while your fingers are braking you are doing it wrong.
I ride with my right forefinger always extended over the front brake lever. The rest of the fingers curl around the handle, but the extended right forefinger “reminds” my body where the brake lever is. The rest of the fingers follow the forefinger when needed. This is part of the “quickly engage” part of a sudden stop sequence. Meanwhile the wrist turn quite separately takes care of acceleration.
Non-visual handling
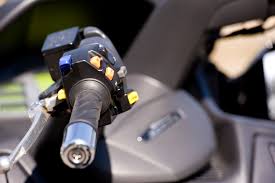
When you ride, can you operate the controls without looking? This includes front light, high/low beam, indicators and horn. Try beeping your horn without looking down at the controls (to see where the horn button is). Why do this? In a “situation” you will almost certainly be busy looking elsewhere. If you cant handle a control without looking, perhaps you wont handle it at all. When you shower, do you need to look at each part of your body to wash it? Of course not. Your kinesthetic sense based in your muscles tells you where everything is! So use this sense, which everyone has, to do things like dip the beam or press the horn. Like all things, practice until you know where each control is by touch, not by sight.
Turning
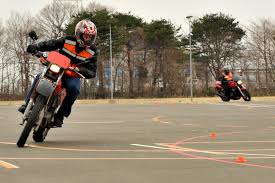
You turn a bike not by steering it, or twisting the handlebars, but by leaning or “falling” into a turn. Your forward momentum then makes the lean create a turn. Going too fast into a turn can run you off the road or put you into oncoming traffic. Either way is a problem, but judging the line of a turn before you enter it is not easy. So the general rule is slow down into a turn then accelerate out of it. Slowing down into a turn lets you judge the line of the turn, then when you get that you accelerate out to increase control. Accelerating into a turn is like diving into a pool when you dont know how deep the water is.
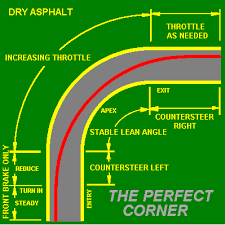
Judging the lean needed to give the right trajectory line on a turn requires skill. So take it easy early on. With experience, you will “see” the curve the bike should take as a turn line. The turn line also varies with the situation, so when turning where there is oncoming traffic, you might keep to the side of the road away from them. In wet weather you have to lean less because of reduced tire friction. You can reduce the amount of turn by “cutting” the corner, start outside the lane, then go inside, then back outside again.
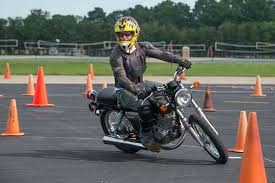
Normally when riding you look where the bike is pointing, as that is where it is going. But when turning, where the bike is pointing is not where it is going. As you turn, you will be looking at the road side, not the road ahead. So drag your vision up from the front wheels to the turn line end-point. Lock your early warning risk “radar” to where you are going, not where you are pointing. When you turn, unlock your eyes from your habitual “front” to look ahead where the turn is taking you.
The Ready Reaction
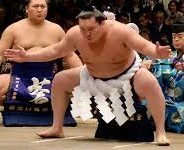
Before the brain reacts to any situation it has to prepare and preparation time can be as long as the reaction time. If it takes half a second to react, it might take half a second to decide what the reaction is. Getting in a ready state, as in the sumo wrestler picture, is all about reducing response time, and the ready state is:
- Front brake. Extend one finger over front brake lever.
- Back brake. With heel on the peg, the right foot “covers” the back brake.
- Accelerator. Right wrist stops any acceleration.
- Clutch/Gear. Left fingers extend over the clutch lever and left foot recognizes the gear.

Interestingly, the same principle of readiness applies to societies, e.g. the U.S. military five levels of readiness, from DEFCON 5 (safe) to DEFCON 1 (severe). The motorcycle ready reaction is like a DEFCON Yellow, which is “On Guard”. It is not a big deal, like some red alert, but a precautionary state that improves reaction time. Fingers on front brake and foot over back brake makes you ready to stop if necessary. Not accelerating makes your speed reduce. Clutch and gear are ready to drop down a gear if needed for more control. And of course your awareness goes up. What initiates a ready reaction is your sense of risk, that something might happen, as when going through an intersection.
The ready reaction as an advanced riding skill must be practiced until it is automatic. You say “Go!” and it happens right away. All of the above happen simultaneously, but in itself the ready reaction does nothing at all – it just gets you ready to do something. And when automatic it happens with no effort, almost subconsciously, so it took me a while to realize I was doing this. Many times you may go to ready mode and nothing happens, e.g. when you see children on the side of the road. If nothing does you have lost nothing, but if something does you are ready. The ready reaction is the most valuable safety skill you can learn because it saves vital half-seconds that may make all the difference.